Custom Content Support
ForeFlight allows you to import and display different kinds of custom content in ForeFlight’s Maps view: Geo-referenced Charts, Map Layers, and Waypoints. This support page walks through the details and import methods for each content type.
Content Packs
Content Packs allow you to bundle multiple custom content files together in a single pack that you can import and share. Content Packs can include any of the content types described on this page, as well as documents linked to specific waypoints. Content Packs are supported for all individual "Plus" plans, Business Performance, and MFB Performance subscription plans. Click here to learn more about content packs.
Watch the video
Importing Custom Content
Three import methods are available to get custom user content into ForeFlight: importing via AirDrop, importing via email or online hyperlinks, and importing via iTunes.
Importing via AirDrop
Importing via AirDrop from a nearby Apple computer is fast and convenient, espeically if a Wi-Fi network is not available. Bluetooth and Wi-Fi must be enabled on both devices for AirDrop to work. You can import .kml and .mbtiles files using AirDrop, but not .csv files.
Simply drag one or more user content files from your computer's Finder into the AirDrop folder, and drop them onto the device that you wish to transfer them to. A popup on the receiving device will ask what app you want to send the imported file to. Tap "ForeFlight" and the file will be immediately added to the appropriate list in More > Custom Content.
Importing via Email/Hyperlinks
Importing custom content via email or hyperlinks is also easy, and allows you to import files to more than one device at a time. You can import .kml and .mbtiles files using using email or hyperlinks, but not .csv files.
Step 1: Send the file as an email attachment
Attach one or more custom content files to an email and send it to whatever recipient(s) you want to have the file (which may be your own email address).
Step 2: Import the file to ForeFlight
Open the email in the Apple Mail app and tap-hold on the attachment with the name of the file you want to import. After the share modal appears, scroll through the app list in the middle until you reach ForeFlight, then tap "Copy to ForeFlight". This will open ForeFlight and, if the file being imported is a .mbtiles file, ForeFlight will display a message that the import was successful and add the file to your list of Custom Charts. If the imported file is a .kml file containing more than just points (e.g. lines and shapes), ForeFlight will automatically add it to your list of Custom Map Layers. If the .kml file only contains points then ForeFlight will ask whether you want to import it as a Custom Map Layers file or as a User Waypoints file. After choosing one or the other ForeFlight will add the file to the proper list.
The process above can also be used to import KML files from webpage hyperlinks (the hyperlinked KML files at the bottom of this page can be used to test the process). Tap on the hyperlink, then tap "More..." and scroll through the app list until you reach ForeFlight, then tap "Copy to ForeFlight" to import the file.
Importing via iTunes
Importing custom content files via iTunes is slightly more involved than the previous methods, and since it requires a direct USB connection between a computer with the files and the device that the files will be imported to, this method of importing can only be done with one device at a time. The upside of this method is that it can be performed without an internet connection or email access. This is also the only method available to import User Waypoint .csv files.
The following video walks through the process of importing KML files via iTunes. Note that the Custom Content tab in ForeFlight is not discussed because the video was made before that tab was introduced.
Step 1: Connect your device to iTunes
Plug your iPad or iPhone into your computer via the Apple USB cord. Start iTunes on your computer, or wait for it to automatically start.
Step 2: Click on your device name in iTunes
Inside iTunes, click on the icon for your iPad or iPhone. The connected device icon is near the top left of the iTunes screen.
Step 3: Click on the 'Apps' tab for your device
Inside the window for your device, click on the 'Apps' listing on the left. It should show all of the apps you have installed on your device. Scroll to the 'File Sharing' section at the bottom of the page and click on 'ForeFlight'.
Step 4: Drag your files into iTunes
On the right, you will see a table called 'ForeFlight Documents'. If this is the first time you've imported anything to the app, this listing will be empty.
Drag your custom content files and drop them onto the 'ForeFlight Documents' table. While the files are copying over to your device, you will see a brief 'Sync in Progress' message on your device.

Step 5: Launch ForeFlight
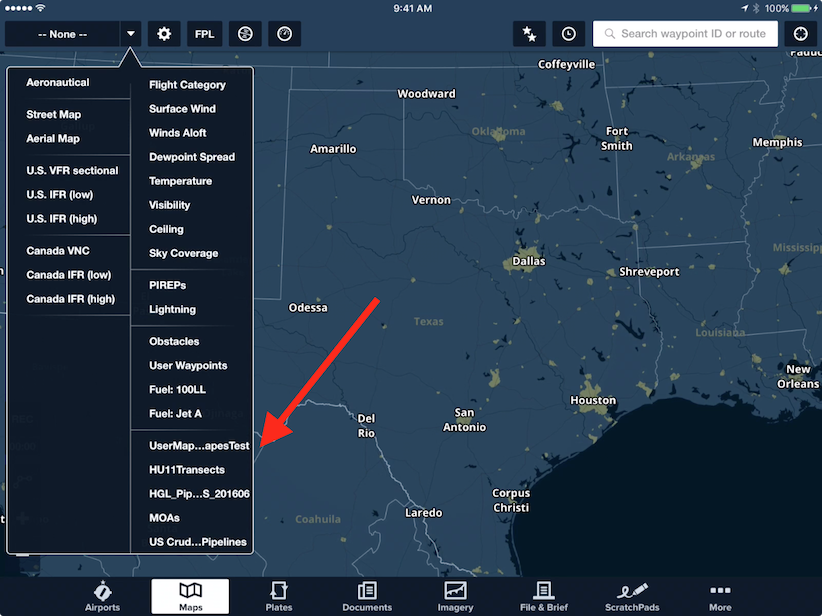
If the imported file is either an .mbiles file or a .kml file containing more than just points, ForeFlight will automatically add it to the Custom Charts or Custom Map Layers lists, respectively. If the file is a .kml file containing only points then ForeFlight will ask whether you want to import it as a Custom Map Layers file or as a User Waypoints file. After choosing one or the other ForeFlight will add the file to the proper list. Newly-imported Custom Charts and Custom Map Shapes will also appear at the bottom of the layer selector, on the left and right, respectively. The names are taken directly from the filename, excluding the extension. Tap on one of the new charts or layers to display it on the map.
Custom Charts
Building MBtiles Files
ForeFlight supports importing custom charts using the MBTiles, GeoPDF, and, for Military Flight Bag users, GeoTIFF file types; however, we recommend that most customers use the MBTiles format as these are the easiest to create.
The Custom Charts feature supports MBTiles, an open source file format developed by MapBox that allows for efficient compression and distribution of large charts. There are a number of tools used to generate .mbtiles files. A good free option is MapTiler, which allows you to import images, manually georeference them by aligning the imagine within a coordinate system, and then export them as .mbtiles files.
Supported Data Types
.mbtiles files can contain both raster and vector maps, but the current implementation in ForeFlight only supports raster maps. If you import and display a file contianing vector data, the part of the chart using vector data (which may be the entire thing) will show hash marks on the map with the words "Unsupported data type".
Sample Files
The following files provides some examples of what kind of charts can be imported to ForeFlight. Click on a filename to download it through your browser, or opening it directly in ForeFlight using the instruction for importing via hyperlinks above.
California-nautical.mbtiles (20.7 MB) - A nautical map of the California coast extending from San Diego to San Franscisco.
Custom Map Layers
Building KML Files
KML (Keyhole Markup Language) is a common file type used for displaying geographic information. If you want to create your own custom map layers, rather than using pre-built files found online, you will need to build them yourself. There are many programs that allow you to build and export custom map layers as KML files, one of the simplest being Google’s “My Maps” program. After creating a new map, follow the instructions here to download the map as a KML file.
Supported Data Types
The full KML standard supports a very large variety of different data types, allowing you to specify things like simple geometries, time-dependent feature, camera perspectives, and even guided tours. A full list of data types supported by KML can be found at the top of Google’s KML developer reference page.
ForeFlight’s Custom Map Layers feature supports only a small subset of these data types, contained primarily in the Geometry, StyleSelector, and SubStyle groupings (using the organization defined on the reference page). This is sufficient for creating simple or complex arrangements of shapes, lines, and points with support for labels and icon styles.
Below is the full list of data types that ForeFlight supports. If you import a file that includes elements not listed here, the unsupported elements should be simply ignored by ForeFlight and the rest of the file will display correctly.
- Point
- LineString
- LinearRing
- Polygon
- MultiGeometry
- Style
- StyleMap (only the "normal" style is supported)
- LineStyle
- PolyStyle
- IconStyle
- gx:LabelVisibility (only Google extension namespace currently supported)
Sample Files
The following files provide some examples of the flexibility of Custom Map Layers. You can view the contents of each file by opening them in a plain text editor like TextEdit. Click on a filename to download it through your browser, or opening it directly in ForeFlight using the instruction for importing via hyperlinks above.
UserMapShapesSample.kml (65 KB) - Demonstrates the supported icon styles and examples of lines, polygons, and circles.
US_Crude_Oil_Pipelines.kml (134 KB) - Basic map showing the network of crude oil pipelines in the US.
US_HGL_Pipelines.kml (71 KB) - Basic map showing the network of HGL pipelines in the US.
Texas_Counties.kml (1.5 MB) - Shows all county borders in the state of Texas.
Alaskan_Coast.kml (3 MB) - Detailed map outlining the state of Alaska. As with other large KML files, there will be a delay of up to a few seconds between tapping on the layer and it appearing on the map as the app works to render the file.
User Waypoints
Creating User Waypoints
There are two places in ForeFlight where you can add new user waypoints: the Maps view and the User Waypoints page in More > Custom Content. You can also build a .kml or .csv file containing multiple user waypoints for bulk import into ForeFlight - .kml files can be imported using any of the methods described above, while .csv files can only be imported using the iTunes method.
Creating User Waypoints from the Maps View
The Maps view is the best place to create new user waypoints if you know the location of the point you want to save on the map (by looking at the Aerial map layer, for example), but you don't know the coordinates of that point. Tap-hold on the point (place one finger on the map without lifting it) until the "Add to Route" popup appears. The first line of the popup shows the geographic coordinates and ground elevation at that point. Tap "More" to the right of the line and tap "Save". This will bring up the "User Wapoint" popup, allowing you to enter a name (required) and description (optional) for the new waypoint. Tap "Save" in the top right to save the point as a User Waypoint. You can then display the new point by enabling the "User Waypoints" layer on the Maps view.
Creating User Waypoints from the User Waypoints Page
If you know the geographic coordinates of the point you want to add then you can add it from the User Waypoints page in More > Custom Content. Tap the Plus button in the top right of the page to open the New User Waypoint form. Enter the name (required), description (optional), and lat/long of the point. Acceptable formats for longtitude entry are shown below the form. Tap "Save" in the top right to save the point as a User Waypoint. The User Waypoints page also allows you to edit pre-existing User Waypoints by tapping the blue "i" next to a waypoint. You can view a single user waypoint on the Map without enabling the User Waypoint layer by tapping on a user waypoint in the User Waypoints page.
Creating a Bulk User Waypoints File
Two file formats are supported for user waypoint files: CSV and KML. CSV is a simple comma-separated format which can exported from Excel or Google Sheets, or can be created by hand. KML is an XML-based format that can be easily created from programs like Google Earth.
Waypoint names must:
Be at least 3 characters long including at least one letter.
Be ALL CAPS.
Be one word with no spaces.
For example: THE_CABIN is OK, while The Cabin is NOT OK because it includes lower-case and a space.
Additionally, only the first 30-40 characters of the description will be visible, so keeping them short is a good idea.
Lat/lon values should be in simple numeric decimal-degree format (ie: 34.7 or -81.457, where "negative" Longitude indicates W). No other Lat/Lon formats are supported for bulk importing.
The CSV file must be organized as follows:
WAYPOINT_NAME,Waypoint description,Lat,Lon
For example:

MY_HOUSE,My house,38.1,-79.2

PROPERTY_ALPHA,First house to observe,40.588,-80.1295
If no description is entered, you must indicate the empty description column with "". For example:
ANOTHER,"",39.22,-81.966
KML Example available:
user_waypoints.kml (3.0 KB)